Advanced
CherryPy has support for more advanced features that these sections will describe.
Contents
Set aliases to page handlers
A fairly unknown, yet useful, feature provided by the cherrypy.expose()
decorator is to support aliases.
Let’s use the template provided by tutorial 03:
import random
import string

import cherrypy

class StringGenerator(object):
    @cherrypy.expose(['generer', 'generar'])
    def generate(self, length=8):
        return ''.join(random.sample(string.hexdigits, int(length)))

if __name__ == '__main__':
    cherrypy.quickstart(StringGenerator())
In this example, we create localized aliases for the page handler. This means the page handler will be accessible via:
- /generate
- /generer (French)
- /generar (Spanish)
Obviously, your aliases may be whatever suits your needs.
Note
The alias may be a single string or a list of them.
RESTful-style dispatching
The term RESTful URL is sometimes used to talk about friendly URLs that nicely map to the entities an application exposes.
Important
We will not enter the debate around what is restful or not but we will showcase two mechanisms to implement the usual idea in your CherryPy application.
Let’s assume you wish to create an application that exposes music bands and their records. Your application will probably have the following URLs:
- http://hostname/<artist>/
- http://hostname/<artist>/albums/<album_title>/
It’s quite clear you would not create a page handler named after every possible band in the world. This means you will need a page handler that acts as a proxy for all of them.
The default dispatcher cannot deal with that scenario on its own because it expects page handlers to be explicitely declared in your source code. Luckily, CherryPy provides ways to support those use cases.
See also
This section extends from this stackoverflow response.
The special _cp_dispatch method
_cp_dispatch is a special method you declare in any of your controller
to massage the remaining segments before CherryPy gets to process them.
This offers you the capacity to remove, add or otherwise handle any segment
you wish and, even, entirely change the remaining parts.
import cherrypy

class Band(object):
    def __init__(self):
        self.albums = Album()

    def _cp_dispatch(self, vpath):
        if len(vpath) == 1:
            cherrypy.request.params['name'] = vpath.pop()
            return self

        if len(vpath) == 3:
            cherrypy.request.params['artist'] = vpath.pop(0)  # /band name/
            vpath.pop(0) # /albums/
            cherrypy.request.params['title'] = vpath.pop(0) # /album title/
            return self.albums

        return vpath

    @cherrypy.expose
    def index(self, name):
        return 'About %s...' % name

class Album(object):
    @cherrypy.expose
    def index(self, artist, title):
        return 'About %s by %s...' % (title, artist)

if __name__ == '__main__':
    cherrypy.quickstart(Band())
Notice how the controller defines _cp_dispatch, it takes a single argument, the URL path info broken into its segments.
The method can inspect and manipulate the list of segments, removing any or adding new segments at any position. The new list of segments is then sent to the dispatcher which will use it to locate the appropriate resource.
In the above example, you should be able to go to the following URLs:
The /nirvana/ segment is associated to the band and
the /nevermind/ segment relates to the album.
To achieve this, our _cp_dispatch method works on the idea that the default dispatcher matches URLs against page handler signatures and their position in the tree of handlers.
In this case, we take the dynamic segments in the URL (band and record names), we inject them into the request parameters and we remove them from the segment lists as if they had never been there in the first place.
In other words, _cp_dispatch makes it as if we were working on the following URLs:
The popargs decorator
cherrypy.popargs() is more straightforward as it gives a name to any segment
that CherryPy wouldn’t be able to interpret otherwise. This makes the
matching of segments with page handler signatures easier and helps CherryPy
understand the structure of your URL.
import cherrypy

@cherrypy.popargs('band_name')
class Band(object):
    def __init__(self):
        self.albums = Album()

    @cherrypy.expose
    def index(self, band_name):
        return 'About %s...' % band_name

@cherrypy.popargs('album_title')
class Album(object):
    @cherrypy.expose
    def index(self, band_name, album_title):
        return 'About %s by %s...' % (album_title, band_name)

if __name__ == '__main__':
    cherrypy.quickstart(Band())
This works similarly to _cp_dispatch but, as said above, is more explicit and localized. It says:
- take the first segment and store it into a parameter named band_name
- take again the first segment (since we removed the previous first) and store it into a parameter named album_title
Note that the decorator accepts more than a single binding. For instance:
@cherrypy.popargs('album_title')
class Album(object):
    def __init__(self):
        self.tracks = Track()

@cherrypy.popargs('track_num', 'track_title')
class Track(object):
    @cherrypy.expose
    def index(self, band_name, album_title, track_num, track_title):
        ...
This would handle the following URL:
Notice finally how the whole stack of segments is passed to each page handler so that you have the full context.
Error handling
CherryPy’s HTTPError class supports raising immediate responses in the case of
errors.
class Root:
    @cherrypy.expose
    def thing(self, path):
        if not authorized():
            raise cherrypy.HTTPError(401, 'Unauthorized')
        try:
            file = open(path)
        except FileNotFoundError:
            raise cherrypy.HTTPError(404)
HTTPError.handle is a context manager which supports translating exceptions
raised in the app into an appropriate HTTP response, as in the second example.
class Root:
    @cherrypy.expose
    def thing(self, path):
        with cherrypy.HTTPError.handle(FileNotFoundError, 404):
            file = open(path)
Streaming the response body
CherryPy handles HTTP requests, packing and unpacking the low-level details, then passing control to your application’s page handler, which produce the body of the response. CherryPy allows you to return body content in a variety of types: a string, a list of strings, a file. CherryPy also allows you to yield content, rather than return content. When you use “yield”, you also have the option of streaming the output.
In general, it is safer and easier to not stream output. Therefore,
streaming output is off by default. Streaming output and also using sessions
requires a good understanding of how session locks work.
The “normal” CherryPy response process
When you provide content from your page handler, CherryPy manages the conversation between the HTTP server and your code like this:

Notice that the HTTP server gathers all output first and then writes everything to the client at once: status, headers, and body. This works well for static or simple pages, since the entire response can be changed at any time, either in your application code, or by the CherryPy framework.
How “streaming output” works with CherryPy
When you set the config entry “response.stream” to True (and use “yield”), CherryPy manages the conversation between the HTTP server and your code like this:
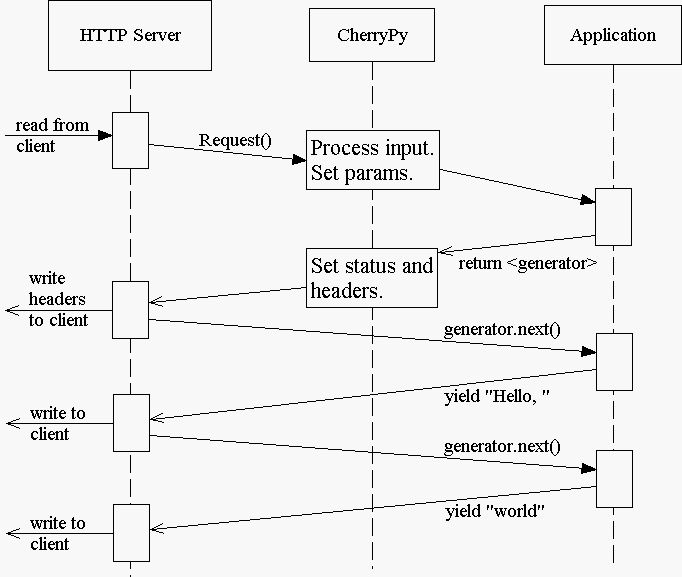
When you stream, your application doesn’t immediately pass raw body content back to CherryPy or to the HTTP server. Instead, it passes back a generator. At that point, CherryPy finalizes the status and headers, before the generator has been consumed, or has produced any output. This is necessary to allow the HTTP server to send the headers and pieces of the body as they become available.
Once CherryPy has set the status and headers, it sends them to the HTTP server, which then writes them out to the client. From that point on, the CherryPy framework mostly steps out of the way, and the HTTP server essentially requests content directly from your application code (your page handler method).
Therefore, when streaming, if an error occurs within your page handler, CherryPy will not catch it–the HTTP server will catch it. Because the headers (and potentially some of the body) have already been written to the client, the server cannot know a safe means of handling the error, and will therefore simply close the connection (the current, builtin servers actually write out a short error message in the body, but this may be changed, and is not guaranteed behavior for all HTTP servers you might use with CherryPy).
In addition, you cannot manually modify the status or headers within your page handler if that handler method is a streaming generator, because the method will not be iterated over until after the headers have been written to the client. This includes raising exceptions like HTTPError, NotFound, InternalRedirect and HTTPRedirect. To use a streaming generator while modifying headers, you would have to return a generator that is separate from (or embedded in) your page handler. For example:
class Root:
    @cherrypy.expose
    def thing(self):
        cherrypy.response.headers['Content-Type'] = 'text/plain'
        if not authorized():
            raise cherrypy.NotFound()
        def content():
            yield "Hello, "
            yield "world"
        return content()
    thing._cp_config = {'response.stream': True}
Streaming generators are sexy, but they play havoc with HTTP. CherryPy allows you to stream output for specific situations: pages which take many minutes to produce, or pages which need a portion of their content immediately output to the client. Because of the issues outlined above, it is usually better to flatten (buffer) content rather than stream content. Do otherwise only when the benefits of streaming outweigh the risks.
Response timeouts
CherryPy responses include 3 attributes related to time:
response.time: thetime.time()at which the response beganresponse.timeout: the number of seconds to allow responses to runresponse.timed_out: a boolean indicating whether the response has timed out (default False).
The request processing logic inspects the value of response.timed_out at
various stages; if it is ever True, then TimeoutError is raised.
You are free to do the same within your own code.
Rather than calculate the difference by hand, you can call
response.check_timeout to set timed_out for you.
Note
The default response timeout is 300 seconds.
Timeout Monitor
In addition, CherryPy includes a cherrypy.engine.timeout_monitor which
monitors all active requests in a separate thread; periodically, it calls
check_timeout on them all. It is subscribed by default. To turn it off:
[global]
engine.timeout_monitor.on: False
or:
cherrypy.engine.timeout_monitor.unsubscribe()
You can also change the interval (in seconds) at which the timeout monitor runs:
[global]
engine.timeout_monitor.frequency: 60 * 60
The default is once per minute. The above example changes that to once per hour.
Deal with signals
This engine plugin is instantiated automatically as
cherrypy.engine.signal_handler.
However, it is only subscribed automatically by cherrypy.quickstart().
So if you want signal handling and you’re calling:
tree.mount()
engine.start()
engine.block()
on your own, be sure to add before you start the engine:
engine.signals.subscribe()
Windows Console Events
Microsoft Windows uses console events to communicate some signals, like Ctrl-C. Deploying CherryPy on Windows platforms requires Python for Windows Extensions, which are installed automatically, being provided an extra dependency with environment marker. With that installed, CherryPy will handle Ctrl-C and other console events (CTRL_C_EVENT, CTRL_LOGOFF_EVENT, CTRL_BREAK_EVENT, CTRL_SHUTDOWN_EVENT, and CTRL_CLOSE_EVENT) automatically, shutting down the bus in preparation for process exit.
Securing your server
Note
This section is not meant as a complete guide to securing a web application or ecosystem. Please review the various guides provided at OWASP.
There are several settings that can be enabled to make CherryPy pages more secure. These include:
Transmitting data:
- Use Secure Cookies
Rendering pages:
- Set HttpOnly cookies
- Set XFrame options
- Enable XSS Protection
- Set the Content Security Policy
An easy way to accomplish this is to set headers with a tool and wrap your entire CherryPy application with it:
import cherrypy

# set the priority according to your needs if you are hooking something
# else on the 'before_finalize' hook point.
@cherrypy.tools.register('before_finalize', priority=60)
def secureheaders():
    headers = cherrypy.response.headers
    headers['X-Frame-Options'] = 'DENY'
    headers['X-XSS-Protection'] = '1; mode=block'
    headers['Content-Security-Policy'] = "default-src='self'"
Note
Read more about those headers.
Then, in the configuration file (or any other place that you want to enable the tool):
[/]
tools.secureheaders.on = True
If you use sessions you can also enable these settings:
[/]
tools.sessions.on = True
# increase security on sessions
tools.sessions.secure = True
tools.sessions.httponly = True
If you use SSL you can also enable Strict Transport Security:
 # add this to secureheaders():
 # only add Strict-Transport headers if we're actually using SSL; see the ietf spec
 # "An HSTS Host MUST NOT include the STS header field in HTTP responses
 # conveyed over non-secure transport"
 # http://tools.ietf.org/html/draft-ietf-websec-strict-transport-sec-14#section-7.2
 if (cherrypy.server.ssl_certificate != None and cherrypy.server.ssl_private_key != None):
headers['Strict-Transport-Security'] = 'max-age=31536000'  # one year
Next, you should probably use SSL.
Multiple HTTP servers support
CherryPy starts its own HTTP server whenever you start the engine. In some cases, you may wish to host your application on more than a single port. This is easily achieved:
from cherrypy._cpserver import Server
server = Server()
server.socket_port = 8090
server.subscribe()
You can create as many server
server instances as you need, once subscribed,
they will follow the CherryPy engine’s life-cycle.
WSGI support
CherryPy supports the WSGI interface defined in PEP 333 as well as its updates in PEP 3333. It means the following:
- You can host a foreign WSGI application with the CherryPy server
- A CherryPy application can be hosted by another WSGI server
Make your CherryPy application a WSGI application
A WSGI application can be obtained from your application as follows:
import cherrypy
wsgiapp = cherrypy.Application(StringGenerator(), '/', config=myconf)
Simply use the wsgiapp instance in any WSGI-aware server.
Host a foreign WSGI application in CherryPy
Assuming you have a WSGI-aware application, you can host it
in your CherryPy server using the cherrypy.tree.graft
facility.
def raw_wsgi_app(environ, start_response):
    status = '200 OK'
    response_headers = [('Content-type','text/plain')]
    start_response(status, response_headers)
    return ['Hello world!']

cherrypy.tree.graft(raw_wsgi_app, '/')
Important
You cannot use tools with a foreign WSGI application. However, you can still benefit from the CherryPy bus.
No need for the WSGI interface?
The default CherryPy HTTP server supports the WSGI interfaces defined in PEP 333 and PEP 3333. However, if your application is a pure CherryPy application, you can switch to a HTTP server that by-passes the WSGI layer altogether. It will provide a slight performance increase.
import cherrypy

class Root(object):
    @cherrypy.expose
    def index(self):
        return "Hello World!"

if __name__ == '__main__':
    from cherrypy._cpnative_server import CPHTTPServer
    cherrypy.server.httpserver = CPHTTPServer(cherrypy.server)

    cherrypy.quickstart(Root(), '/')
Important
Using the native server, you will not be able to graft a WSGI application as shown in the previous section. Doing so will result in a server error at runtime.
WebSocket support
WebSocket is a recent application protocol that came to life from the HTML5 working-group in response to the needs for bi-directional communication. Various hacks had been proposed such as Comet, polling, etc.
WebSocket is a socket that starts its life from a HTTP upgrade request. Once the upgrade is performed, the underlying socket is kept opened but not used in a HTTP context any longer. Instead, both connected endpoints may use the socket to push data to the other end.
CherryPy itself does not support WebSocket, but the feature is provided by an external library called ws4py.
Database support
CherryPy does not bundle any database access but its architecture makes it easy to integrate common database interfaces such as the DB-API specified in PEP 249. Alternatively, you can also use an ORM such as SQLAlchemy or SQLObject.
You will find here a recipe on how integrating SQLAlchemy using a mix of plugins and tools.
HTML Templating support
CherryPy does not provide any HTML template but its architecture makes it easy to integrate one. Popular ones are Mako or Jinja2.
You will find here a recipe on how to integrate them using a mix plugins and tools.
Testing your application
Web applications, like any other kind of code, must be tested. CherryPy provides
a helper class to ease writing
functional tests.
Here is a simple example for a basic echo application:
import cherrypy
from cherrypy.test import helper

class SimpleCPTest(helper.CPWebCase):
    def setup_server():
        class Root(object):
            @cherrypy.expose
            def echo(self, message):
                return message

        cherrypy.tree.mount(Root())
    setup_server = staticmethod(setup_server)

    def test_message_should_be_returned_as_is(self):
        self.getPage("/echo?message=Hello%20world")
        self.assertStatus('200 OK')
        self.assertHeader('Content-Type', 'text/html;charset=utf-8')
        self.assertBody('Hello world')

    def test_non_utf8_message_will_fail(self):
        """
        CherryPy defaults to decode the query-string
        using UTF-8, trying to send a query-string with
        a different encoding will raise a 404 since
        it considers it's a different URL.
        """
        self.getPage("/echo?message=A+bient%F4t",
                     headers=[
                         ('Accept-Charset', 'ISO-8859-1,utf-8'),
                         ('Content-Type', 'text/html;charset=ISO-8859-1')
                     ]
        )
        self.assertStatus('404 Not Found')
As you can see the, test inherits from that helper class. You should
setup your application and mount it as per-usual. Then, define your various
tests and call the helper getPage()
method to perform a request. Simply use the various specialized
assert* methods to validate your workflow and data.
You can then run the test using py.test as follows:
$ py.test -s test_echo_app.py
The -s is necessary because the CherryPy class also wraps stdin and stdout.
Note
Although they are written using the typical pattern the
unittest module supports, they are not bare unit tests.
Indeed, a whole CherryPy stack is started for you and runs your application.
If you want to really unit test your CherryPy application, meaning without
having to start a server, you may want to have a look at
this recipe.